Garrattfan's Modelrailroading Pages
OO9 NGG16
Chapter 6 Rear tank
October 20, 2008
Not having the correct worms, I couldn't continue with the two drive units (see problem). So I picked up the rear truck superstructure next. I intend to give this loco the color scheme of the 138 of the Welsh Highland Railway. BUT this loco had welded bunkers and tanks. The manual hints that you can sand the rivets off but also remarks "How could you!!". This is where I agree. I couldn't remove those amazingly beautiful rivets. I just couldn't. Rivet counters of the world please forgive me, but I'm building a 138 WITH riveted tanks and bunkers.!! Another matter I must decide on is whether to build a coal or a oil fired version. The 138 is oil fired, the etches depict a coal fired version. |

The etch plate with the origami inner tanks, the rear tank below and the front tank at the top. |
The inner tank after the origami activity. As simple as could be. Photo before soldering during a test fit. |

The outer tank is formed by beautifully etched thin sheets. As you can see these sheets are a little warped. Sheet brass is made by rolling and pressing the brass sheet to the desired thickness. This causes stresses in the sheet on both sides. If you etch away large portions of one side, tension on that side is taken away and the tension on the remaining side warps the sheet. It is an inevitable consequence of the production process. |

Let's roll. It is easily corrected by laying the sheet upside down on a cutting mat and rolling the steel backside of a jeweler's file over it. Gently, easy does the job!! |

The result |
 |

Three of the panels are already attached. This photo demonstrated a good way of clamping the assembly in a vise without damaging the sensitive surface (6.1) |

The official photo after attaching all four sheets and the concave upper panels (6.3) |

The same in a rear quarter view. The opening of the coal chute is clearly visible. Actually I have no idea how this area looks on the WHR138. After the previous photo a five month's pause followed in which I worked on the driving truck. This got on my nerves because I couldn't get the drive and valve gear to work properly. So as a therapeutic measure I decided to finish the superstructure of the rear tank. |

The sandboxes are made of white metal. They need quite a lot of rework because the halves of the casting do not completely match up, resulting in a nasty rim. After filing a little hole must be drilled to accomodate the sandpipe (brass tube 0,7 mm) |

This is how the front of the tank looks after completion. Today I added the little step (rigth), lamp holder (left), large lampholder (middle) and the sandboxes with their pipes. |

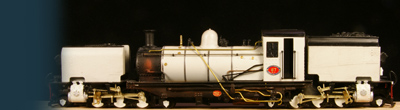
Just for the sake of the photo. About this will be the end result |

One final shot of the rear tank mated to the rear truck. Note some subtle differences with the previous photo.
|


Sign my
GuestBook